The Claude Agent Step runs Claude Code, Anthropic’s agentic tool, as a step in your deployment process or runbook. Out of the box the agent can read and write files, run commands, and reach the web, all subject to the permission and sandbox controls you set. It can also see your non-sensitive deployment variables, save files back to Octopus, and fail the step on a condition you describe. This page covers extending what the agent can do and what it knows: connecting the built-in Octopus MCP server, adding your own MCP servers, and giving the agent skills.
MCP servers
The Model Context Protocol (MCP) is an open standard for connecting an AI agent to external tools and data. An MCP server is a program the agent talks to; it advertises a set of tools (for example “create an issue” or “run a query”), and the agent can call them during the run. Configuring an MCP server is how you let the agent reach systems that Octopus and Claude Code don’t know about on their own.
MCP servers come in two types. A stdio server is a command Octopus runs on the worker or target and talks to over standard input and output; use it for a server you install and run locally, such as an npx package. The command must be installed and resolvable on the machine the step runs on, and because stdio servers start without a login shell, a command such as npx resolves using the worker’s PATH. An http server is a remote endpoint Octopus connects to by URL; use it for a hosted server.
The agent loads only the MCP servers configured on the step, and every MCP tool passes through the same allowlist as the agent’s other tools. The security properties are covered under MCP server security.
Connect the Octopus MCP server
Octopus publishes its own MCP server, which lets an AI agent query and act on your Octopus instance: its projects, releases, deployments, machines, and more. The step wires this server up for the agent automatically whenever an API token variable is set, so the agent can answer questions about your Octopus data and take Octopus actions without you configuring a server by hand.
Before you begin, you’ll need:
npx(Node.js) available on the worker or target that runs the step. The Octopus MCP server runs as annpxpackage, the same as any other stdio MCP server.
To connect the agent to your Octopus instance:
- Create a dedicated agent service account. This gives the agent its own identity, keeps its activity identifiable in the audit log, and lets you revoke it on its own.
- Grant the account the least privilege the task needs. For investigation and reporting, read-only access is usually enough, and it’s what we recommend for a first run.
- Generate an agent API key under the account.
- Store the key as a sensitive variable named
Octopus.Action.Claude.OctopusToken, so the key is kept out of the task log and execution context.
The step adds the Octopus MCP server automatically whenever the Octopus.Action.Claude.OctopusToken variable is set — Octopus supplies the server URL for you — and the agent can call the server’s tools during the run.
All of the Octopus MCP server’s tools are allowed, and the token is the agent’s identity into Octopus, so its permissions are the agent’s authority: whatever the token can do, the agent can do. Scope it deliberately. For how this fits the step’s security model, see MCP server security.
Add an MCP server
Adding an MCP server to the step gives the agent that server’s tools for the run. Follow these steps to configure a server you install locally (stdio) or a hosted endpoint (http).
To add an MCP server to the step:
-
On the step, expand Agent Capabilities (optional) > MCP and select Add MCP.
-
Set Type to
stdioorhttp. -
Enter a unique Name for the server, such as
githuborjira. -
Complete the connection settings for your server type: Command and Arguments for a stdio server, or URL and Headers for an http server. See MCP server settings below.
-
Add any Environment Variables the server needs. Use variable substitution for secrets, for example a value of
#{GitHubToken}, so the token is never stored in plain text on the step. -
In Tools, list which of the server’s tools the agent may call, one per line without the
mcp__<name>__prefix, or leave the default*to allow every tool the server offers. For example:list_issues create_issue -
Save the step.
Octopus turns the Tools entries into the underlying mcp__<name>__<tool> permissions and adds them to the agent’s allowed tools for you. When the step runs, the agent is launched with only the MCP servers configured on the step.
If you clear the Tools field entirely, the agent can’t call any of that server’s tools. Permission modes and tool allowlisting are covered in full on the Security & Compliance page.
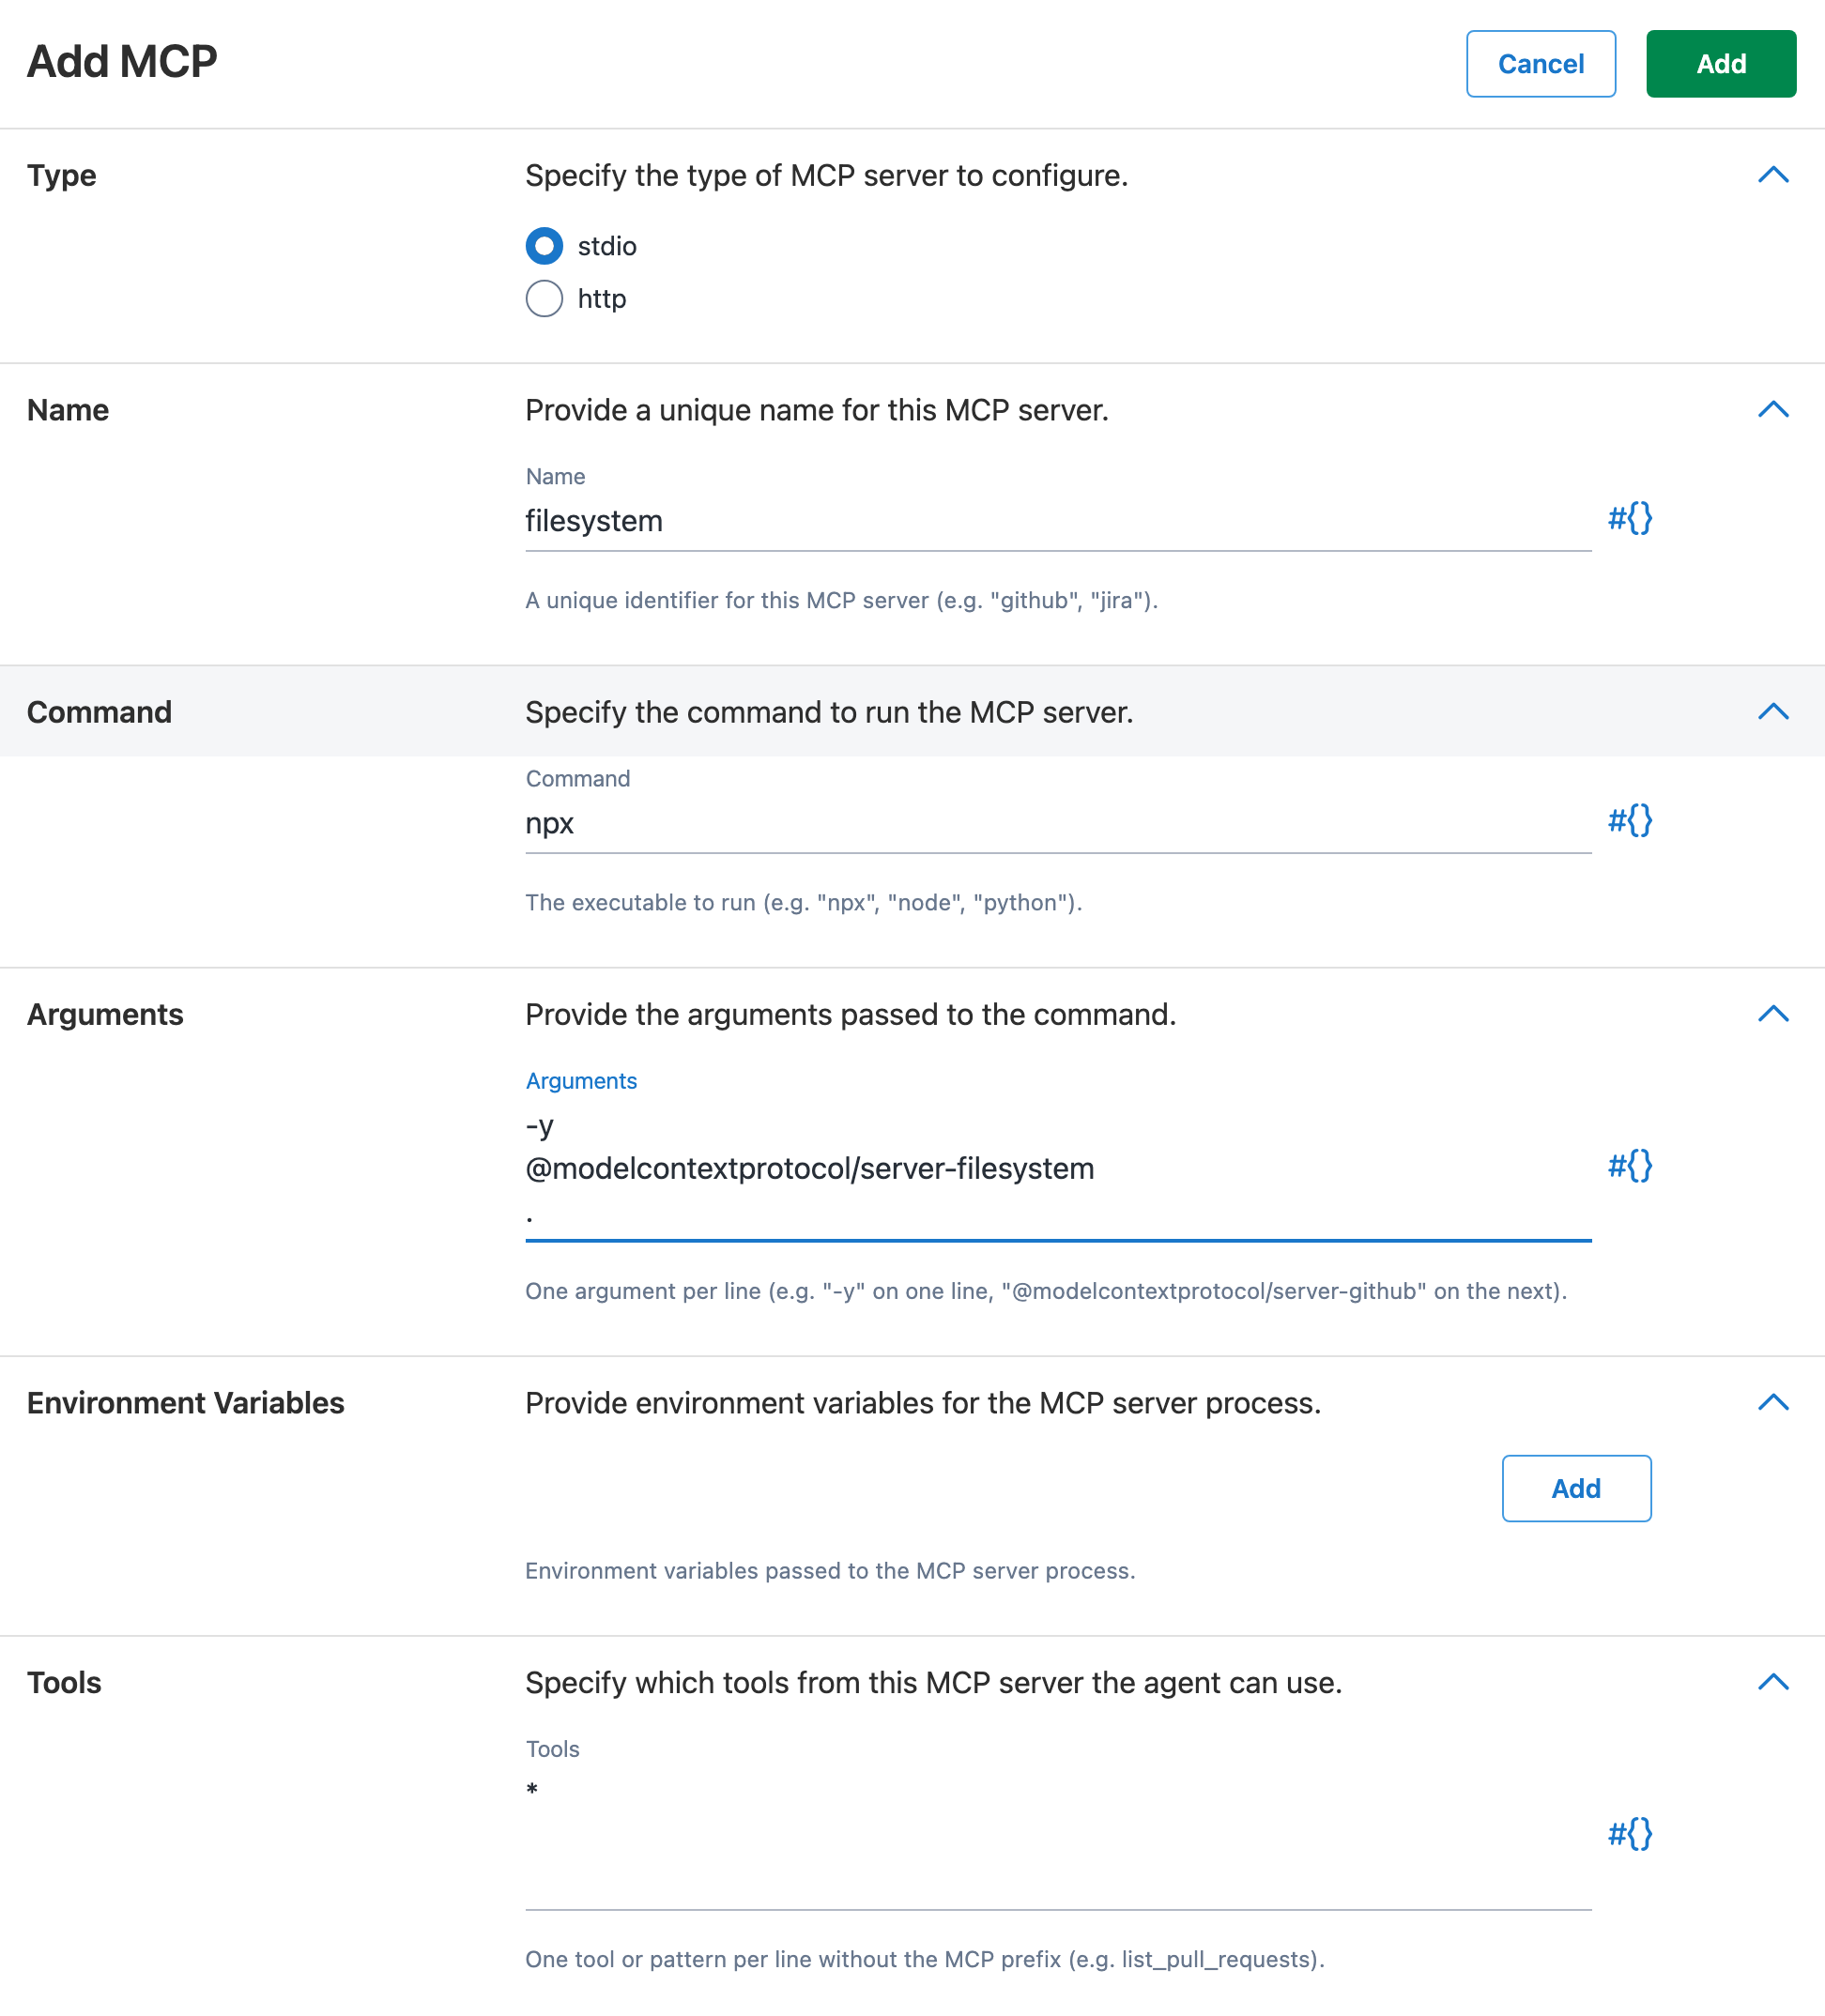
MCP server settings
The Add MCP drawer takes the following settings. Each entry must have a unique name and either a stdio type with a non-empty command or an http type with a non-empty URL.
| Setting | Applies to | Description |
|---|---|---|
| Type | All servers | stdio for a server Octopus runs locally, or http for a remote endpoint. |
| Name | All servers | A unique identifier for this server, such as github or jira. |
| Command | stdio | The executable that starts the server, such as npx, node, or python. Required for stdio servers. |
| Arguments | stdio | Arguments passed to the command, one per line. |
| URL | http | The server’s endpoint. Required for http servers. |
| Headers | http | Name/value pairs sent with each request, for example an Authorization header. |
| Environment Variables | All servers | Name/value pairs set in the server process. Use variable substitution for secrets. |
| Tools | All servers | Which of the server’s tools the agent may call, one per line without the mcp__<name>__ prefix, or * for all. A newly added server allows all tools (*) by default; an empty field allows none. |
As an example, this configuration gives the agent read access to files in its working directory using the reference filesystem MCP server: Type stdio, Name filesystem, Command npx, Arguments -y, @modelcontextprotocol/server-filesystem, and . (one per line), no Environment Variables, and Tools left at the default *. With this in place, a prompt such as “Use the filesystem tools to list the configuration files in the working directory and summarize them” will let the agent call the server’s tools. The npx command must be available on the worker or target that runs the step.
Skills
A skill is a markdown file of instructions that the agent loads on demand. Instead of putting everything in the prompt, you write focused guidance (how your team formats release notes, say, or the steps of a smoke test) and the agent reads it only when the task calls for it. Each skill has a short description, and the agent decides from that description whether the skill is relevant to what you’ve asked.
Built-in skills
Every run of the step includes three skills that connect the agent to Octopus. You don’t configure these; they’re always available to the agent.
Deployment context
The octopus-deployment-context skill tells the agent how to read the deployment’s variables. Before the run, Octopus writes the non-sensitive deployment variables to a deployment-variables.json file in the agent’s working directory. From this, the agent can learn the environment, project, tenant, release version, and any custom variables scoped to the step. When the agent needs more information around the deployment, the agent reads this file rather than guessing.
Saving files as artifacts
The octopus-artifacts skill is how you get files out of a run and into Octopus as artifacts, so they’re downloadable from the deployment or task afterward.
The agent uses this skill only when your prompt explicitly asks for a file to be attached, uploaded, published, or saved to Octopus. To trigger the behavior, say so in the prompt, for example “generate a report and attach it to the deployment as an artifact.”
By default the combined size of all captured artifacts is capped at 5 GB. To raise or lower it, set the Octopus.Action.Claude.MaxArtifactSizeInMegaBytes variable (its value is in megabytes). Exceeding the cap fails the step.
Failing the step on a condition
By default the step succeeds whenever the agent finishes normally, regardless of what it found. The octopus-fail-deployment skill is how you make the step fail on a condition you describe, such as “fail the deployment if the smoke test does not pass.”
When your prompt states a failure condition and the agent decides it has been met, the agent writes a sentinel block in its final message:
<octopus-task-failed>
Smoke test returned HTTP 500 from /health after 3 retries.
</octopus-task-failed>
Octopus detects the closed block and fails the step, surfacing the reason in the task log.
This is a best-effort signal. It depends on the agent correctly following the skill and deciding the condition is met, so it isn’t a deterministic guarantee the way the step’s built-in failure checks are (a non-zero exit, a denied tool call, or a budget or turn limit reached always fail the step). Use it for conditions only the agent can judge, and keep prompts specific about what should count as failure. Deterministic failure handling is covered on the Security & Compliance page.
Add a custom skill
Adding your own skills guides the agent for a particular task without crowding the prompt. Follow these steps to add a skill to the step.
To add a custom skill:
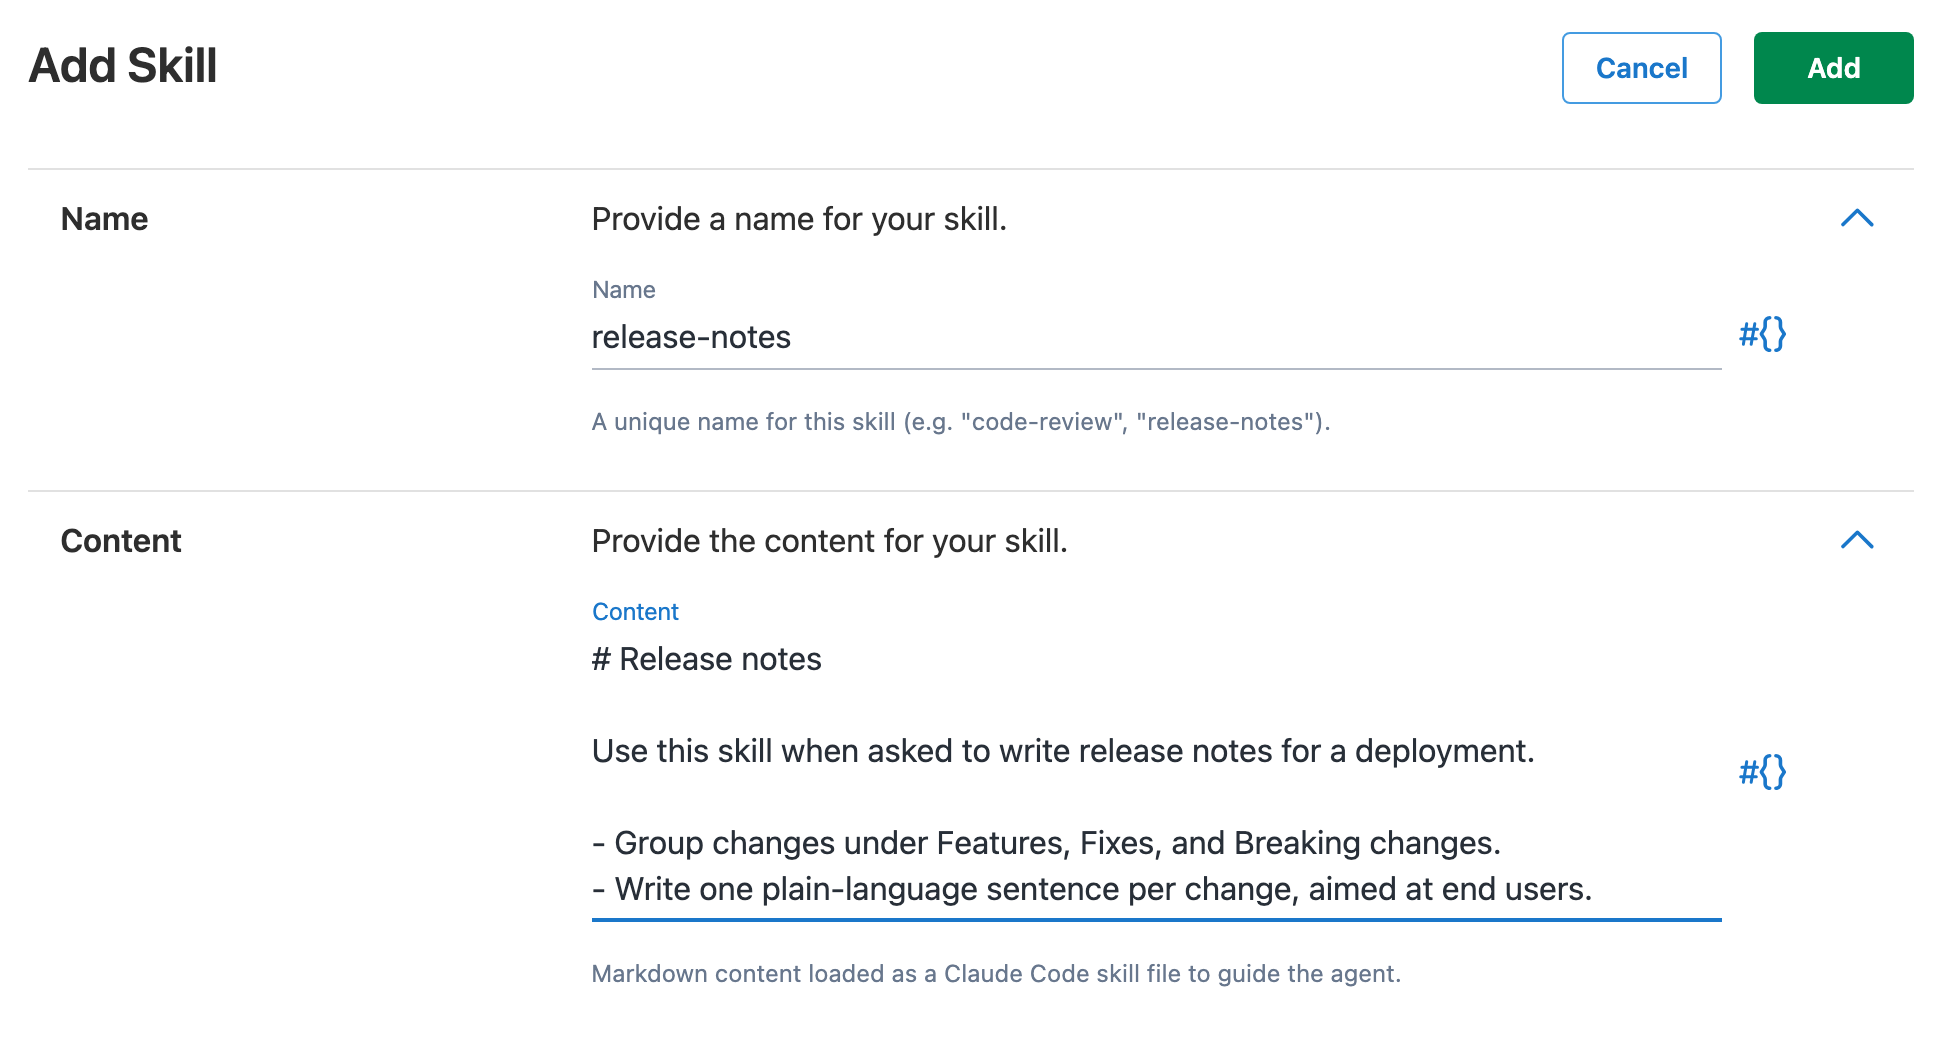
- On the step, expand Agent Capabilities (optional) > Skills and select Add Skill.
- Enter a unique Name for the skill, such as
code-revieworrelease-notes. Skill names must be valid file names: a name containing/,\, or..is rejected when you save the step. - In Content, write the skill’s instructions in markdown. Give the content a clear opening line describing when the skill applies; the agent uses that to decide whether to load it.
- Save the step.
When the step runs, each skill you provide is written to a file the agent can discover, alongside the built-in skills.
Related links
- How the Claude Agent Step works
- Getting started with the Claude Agent Step
- Claude Agent Step security and compliance
- Octopus MCP server
- Model Context Protocol
Help us continuously improve
Please let us know if you have any feedback about this page.
Page updated on Tuesday, July 7, 2026